
The Ultimate Guide to
Headshot Photography in New Bern, NC
Professional, authentic, and completely un-awkward headshot sessions that actually look like you.
Tips on Clothing, Makeup and Hair for Professional Photos
You know that feeling right before a big meeting — when you double-check your collar in the mirror, shake out your nerves, and take a breath because this is your moment?
That's what a great headshot should feel like every single time someone lands on your profile.
It's more than a photo. It's your first impression. Your digital handshake. Your "this is me, and I mean business" moment — delivered before you've said a single word.
But here's the thing: most headshots aren't doing that job. They're just... there. Checked off the list. Forgotten in a phone camera roll. Slapped on a LinkedIn profile that hasn't been touched since 2021.
This guide exists to fix that.
Whether you've never had a professional headshot, you're overdue for an update, or you've had sessions before that left you underwhelmed — this is everything you need to know. What makes a headshot actually work. How to prepare. What to wear. What happens to your hair and makeup (spoiler: it's already handled). What the session feels like. And what to do with your photos once you have them.
New Bern, NC doesn't exactly have a shortage of photographers. But if you want something that looks like you on your best day — not you surviving a photo shoot — let's talk.
Table of Contents: (Jump to any section)
What Makes a Headshot Actually Great
The best compliment I've ever gotten after delivering a gallery: "This looks like how I feel when I'm killing it."
That's the goal. Not perfect. Not stiff. Not a more polished stranger. Just you — on your absolute best day.
An authentic headshot means a few specific things:
Lighting that's clean and intentional. Not harsh. Not flat. Light that adds dimension to your face without dramatic shadows that belong in a film noir.
An expression that's actually yours. Not the "photo smile" — the tight, frozen, slightly panicked version of your face that most people default to in front of a camera. The real one. The one you make when you're confident, engaged, and actually present.
Wardrobe that supports your face, not fights it. The goal is for people to remember you, not what you were wearing. Everything in this guide is designed around that principle.
A setting that's purposeful. Whether that's a clean studio backdrop or a real environment that tells your story, the background should be a deliberate choice — not an accident.
Direction. This is the thing most people don't think about until they're standing in front of a camera wondering what to do with their hands. A great headshot requires someone guiding you through exactly how to position your body, where to place your hands, how to angle your chin, where to look — so your only job is to follow along and let the real expression come out.
(The real expression is never the one you plan. It shows up between poses, mid-laugh, right after something surprises you. I'm watching for it the whole time.)
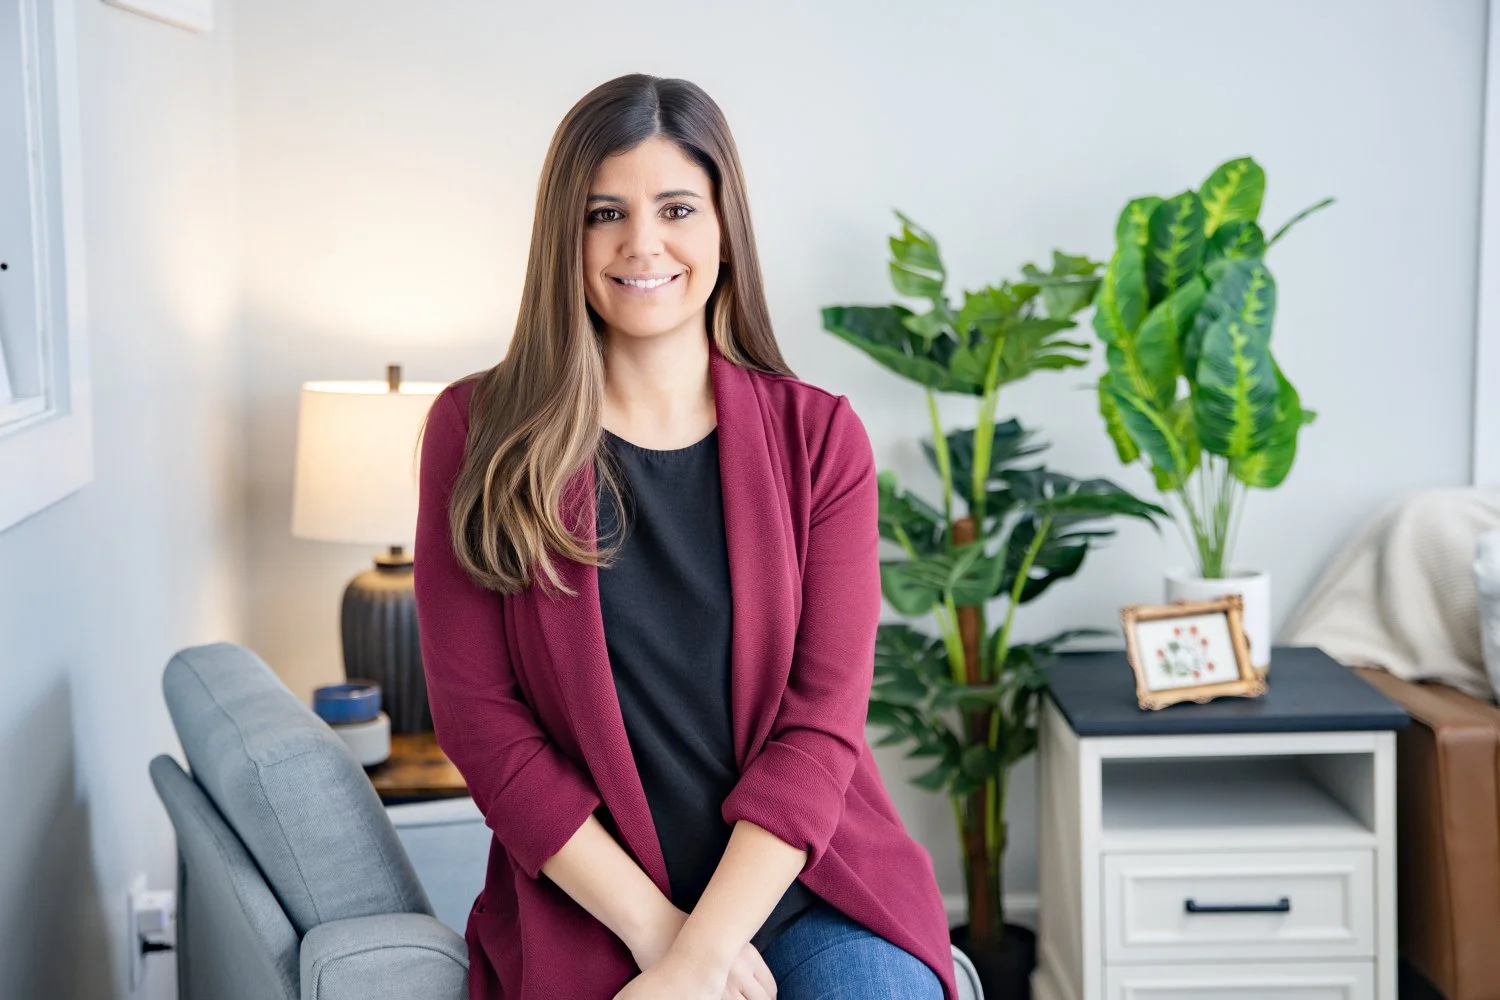
What to Wear
Clothing can make or break a great headshot. The goal is simple: wear something that supports your face and your brand — not something that competes with it.
Colors
The best colors for headshots fall in the mid-tone to jewel-tone range. Rich, saturated, and purposeful — not washed out, not screaming.
Great choices: Navy, burgundy, emerald green, plum, forest green, deep teal, charcoal gray, camel, warm white, rich rust.
Avoid: Bright neons, pastels, turquoise, mint green, bright coral, or anything so loud it pulls attention away from your face. Hot pink is a no. Bright orange is a no.
Black and white both work with intention. All-black photographs strong, especially for black-and-white portraits. A well-fitted white button-up is clean and classic — wear a no-show cami underneath. Neutrals paired with black or white are consistently timeless.
When in doubt: think about your brand colors. Think about what you'd wear to impress your most important client. Start there.
Patterns & Prints
Solids are almost always the right call. Large patterns pull the eye away from your face. Tight patterns — pinstripes, small polka dots, tight checks, tweed — can create a moiré effect on digital screens, a wavy, vibrating distortion that looks strange and can't be fixed in editing.
A print can work underneath a solid layer — a medium-scale floral under a blazer, for example. But if you're going patterned, keep it subtle and layer it strategically.
Fit
This might be the most important thing on this list. Clothing that fits well photographs well. Clothing that doesn't — too tight, too baggy, too boxy — photographs worse than it looks in the mirror.
Avoid baggy or loose fits. They read as larger and less polished on camera. Avoid anything too tight, especially across the shoulders or chest, where pulling and bunching will show. Avoid fabrics that are clingy, shiny, or stretchy — thin polyester, velvet, and anything with visible shimmer will highlight every crease and bump in an unflattering way.
Longer shirts worn untucked should actually be long — they elongate the torso and look intentional.
Arrive with your clothes pressed and lint-free. If your shirt wrinkles easily, hang it up and put it on right before you leave rather than folding it in a bag.
Necklines
The best necklines for headshots are modest V-necks, boat necks, and crew necks. They frame your face without distracting from it.
Avoid turtlenecks — they shorten your neck and throw off your proportions on camera. Avoid very low necklines — too much skin near your face draws attention downward and away from your expression. If you wear a button-up, make sure it fits without pulling or gaping. A collar that's too tight looks uncomfortable because it is.
Sleeves & Layers
Long sleeves or three-quarter sleeves photograph more professionally. Because of how we position your body at an angle to the camera, your arms are often the most camera-facing part of you. Longer sleeves create a cleaner line.
Layers are great because they give us more looks without more outfits. A blazer, cardigan, jacket, or vest can completely change the feel of a look. Strategy: lighter colors underneath, darker on top. A structured jacket that buttons is also great if you're not in love with your midsection — it creates a clean vertical line and draws the eye upward.
If you prefer a sleeveless look, bring a blazer or cardigan as a backup — variety is always worth having.
Logos
Skip them. Unless it's your own company logo on branded attire, logos are a distraction. Designer brands, sports teams, graphic tees — all of it. Clean and neutral wins.
In Person Wardrobe Consult
Here's something most photographers don't do — and it makes a bigger difference than you'd expect.
Before your session, I come to you.
We go through your wardrobe together — in your actual home, with your actual clothes — and figure out exactly what's going to work. Not in theory. Not based on a generic prep email. We're actually pulling pieces, trying combinations, and making real decisions.
Why does this matter? Because most wardrobe stress happens in the hour before a session when you're standing in your closet convinced nothing looks right and panic-packing four bags of options. That's not a great headspace to walk into a photo shoot with.
The in-person consult takes all of that off the table. You already know what you're wearing. You've already thought through the looks. You show up to the session focused — not still deciding.
We'll talk through what reads well on camera versus what's a bad idea even if it looks great in real life. We'll think about how your wardrobe communicates your brand and your industry. And we'll make sure you have 2-3 looks that give us real variety.
No other photographer in Eastern NC is doing this as a standard part of the process. It's one of those things that sounds like a nice extra until you've experienced it — and then it's hard to imagine doing it any other way.
Men’s What To Wear
The same core rules apply, but here's the men's version specifically.
A well-fitting blazer or sport coat is almost always the right move. It reads professional without requiring a full suit, and it photographs extremely well. Make sure the shoulders fit — the seam should sit right at your shoulder, not hanging past it.
Avoid shoulder pads in older suits and jackets. They make you look boxy and tense rather than confident.
Dress shirts: A properly fitted dress shirt under a blazer is classic and versatile. If you're going more casual, a well-fitted button-up with no tie can look great depending on your industry. Avoid short sleeves for most professional headshots.
Ties: Optional. If you wear one, avoid tight geometric patterns and tight stripes — same moiré problem as above. A solid or subtle texture works best.
Colors: Navy, charcoal gray, forest green, burgundy, white, and black all photograph beautifully. Avoid bright colors, neons, and anything with a large graphic or logo.
Fit is everything. A $50 shirt that fits perfectly will look better on camera than a $200 shirt that doesn't. If in doubt, have something tailored — even basic alterations make a dramatic difference.
Hair & Makeup
We’ll Handle it for you
Depending on which package you book, you'll either arrive camera-ready or have a professional hair and makeup artist on set as part of your session.
For sessions that include HMU, that means either Jocelyn with Everlasting Beauty NC or Jessica with Southern Charm Salon — two of the best in Eastern NC — is on set before we ever pick up a camera. You show up, get settled in the chair, and walk into the shoot already feeling like the best version of yourself. Posture changes. Confidence changes. You're not in your head about whether your foundation is sitting right or your hair is doing something weird. The most common thing I hear right after the chair: "Okay. I'm actually excited now."
For sessions where you're coming camera-ready — the tips below are exactly what you need. They're the same guidance our artists follow, just in your hands instead. Read them, apply them, and you'll show up in great shape regardless of which package you're in.
Makeup by Skin Type
The goal is always camera-ready, not stage-ready. Camera-ready means enhanced but natural — your features read clearly, your skin looks even, your eyes pop — but it still looks unmistakably like you.
Here's how that plays out across different skin types:
Fair/Light Skin Fair skin can look washed out under studio lighting if the foundation is too light or too cool-toned. A slightly warmer foundation shade than your everyday one can add warmth and dimension. Blush is important here — a natural rosy or peachy tone keeps your face from disappearing into the background. Avoid very pale or frosty lip colors; they tend to make fair skin appear flat on camera. A soft rose or nude with a hint of warmth reads beautifully.
Medium/Olive Skin Olive skin tones photograph exceptionally well — the natural warmth reads great on camera. The main thing to watch: avoid foundations with a heavy gray or pink undertone, which can make olive skin look muddy. A foundation with a golden or neutral undertone is ideal. Bolder lip colors tend to work well with olive skin — a deep rose, berry, or warm red can be stunning without feeling overdone.
Deep/Dark Skin Deep skin tones often get poorly served by standard prep advice — most of it was written for lighter skin. The biggest issue on camera is flashback: the white cast caused by certain foundations and setting powders (especially those with SPF) under flash or bright studio light. Avoid any foundation or powder with SPF in it for your session. Choose a foundation that's truly your match — not a shade or two lighter, which is a common mistake. Highlight and contour products should be rich and pigmented enough to show up; anything too sheer will disappear. Deep, saturated lip colors are gorgeous on camera for darker skin tones.
Mature/Aging Skin Thicker foundation settles into fine lines and makes them more visible — which is the opposite of what anyone wants. A light-to-medium coverage liquid foundation with a touch of moisture is almost always better than full-coverage or powder-based foundations. Use a translucent setting powder sparingly and only where you need it (usually the T-zone). Cream-based blush and highlight tend to look more natural than powder formulas on mature skin. For lips: a slightly creamier formula with a hint of gloss will make lips appear fuller and more hydrated than matte lipstick.
Combination/Oily Skin The main challenge with oily skin on camera is shine — it shows up quickly under studio lights and can look extreme if not addressed. A matte or long-wear foundation is ideal, followed by a matte setting powder and a setting spray. Keep blotting sheets or a loose powder on hand for touch-ups between outfit changes. Avoid anything with luminizing, glowy, or dewy in the description — beautiful in person, problematic on camera.
Dry/Sensitive Skin Dry skin can look flaky or tight on camera, especially under bright lights. Moisturize well in the days leading up to your session. A hydrating primer before foundation makes a significant difference. Avoid powder-heavy looks — stick with liquid or cream formulas throughout. A light-reflecting or satin-finish foundation (not matte) will give you coverage without accentuating dry patches.
Universal tips regardless of skin type:
Avoid foundations, powders, or SPF products that contain flashback-causing ingredients (look up "flashback makeup" to understand which products to avoid)
No shimmer in eyeshadow — it falls into creases and accentuates texture under studio light
No eyeliner on the lower lash line — it closes down the eye and makes it appear smaller
Black mascara reads better on camera than brown; use a fresh or nearly-new tube
Lips: one shade deeper than your natural color, with a slight shimmer or gloss. Matte lipstick makes lips appear thinner.
Hairstyling
Our artists handle the styling — but knowing what works for your hair type helps you arrive prepared and set the session up for success.
Straight Hair Straight hair photographs cleanly but can look flat if it's not given some shape. Ask for soft waves, a light blowout, or subtle body — anything that gives movement. Pin-straight hair can sometimes look severe on camera, especially with a center part. A slight side part or texture through the ends softens the overall look significantly. Use shine-enhancing products; avoid anything that dulls or mattifies.
Wavy Hair Wavy hair tends to photograph beautifully because it has natural texture and movement built in. The goal is to enhance rather than fight it. Bring the frizz under control with a smoothing product, then let the wave do its thing. Defined, smooth waves almost always look more polished on camera than either fully straight or fully curly — it's a sweet spot. Avoid overworking it with too much product, which can make it look wet or heavy.
Curly Hair Curly hair is stunning in headshots — volume, texture, and presence that straight hair can't replicate. The key is definition and moisture. Frizz and dryness show up clearly on camera, so arrive with hair that's been properly moisturized and defined. Our artists work with your curl pattern, not against it. Let them know your preferred products and techniques. Avoid the temptation to straighten your curls for a "more professional" look — defined, healthy natural curls are 100% professional and often photograph better than a blowout.
Coily/4C Hair Same principle as curly — definition and moisture are everything. Whether you're wearing your natural texture, a protective style, locs, or a blowout, the goal is intentionality. Every style can photograph beautifully when it's executed well and suits your overall look. Don't feel pressure to wear your hair in any particular way to look "appropriate" — wear what makes you feel most like yourself, and our artists will work with it.
Thin/Fine Hair Fine hair can look thinner on camera than it does in person, especially under strong lighting. Volume is your friend. A blowout with a round brush, dry texture spray, or velcro rollers can give fine hair significant lift and body. Avoid heavy products that weigh hair down or make it look stringy. A slightly fuller style tends to balance the frame of the face better in a headshot.
Thick/Coarse Hair Thick hair has natural volume and presence on camera. The main thing to address is frizz and flyaways, which studio lighting picks up mercilessly. A smoothing blowout, anti-frizz serum, or light oil through the ends goes a long way. If your hair tends to puff in humidity (hello, Eastern NC in summer), plan your session timing and have a smoothing product on hand.
Color-Treated Hair Vivid color (balayage, highlights, fashion colors) can photograph strikingly well — it adds dimension and interest. Just make sure your color is fresh or recently refreshed. Faded color can look dull on camera, and visible roots tend to be more noticeable in photos than in person.
Universal hair tips:
Style your hair the way you normally wear it — photo day is not the day to try something new
Avoid buns and ponytails for most headshot styles; they can make it look like you don't have hair when the camera angle changes
Use products that enhance shine, not mattify
Bring a brush or comb and some hairspray for touch-ups between outfit changes
Schedule any haircut 3-5 days before your session, not day-of
Men's Grooming
The prep is simpler for men, but the small things carry more weight than most guys expect.
Show up looking like your best self, not a different self. If you're normally clean-shaven, use an electric razor day-of rather than a blade — it minimizes redness and razor burn that shows up clearly under studio light. If you wear a beard, trim and shape it before your session, not the day before in case you go a little short.
For clients who want to go the extra mile: I work with Chandler, the best barber in New Bern, who can do a fresh lineup, shave, and trim before your session. That fresh cut energy is real — you walk in looking sharp and you feel it.
Don't get a brand-new cut day-of. Schedule it 2-3 days before to let it settle.
Moisturize in the days leading up to your session. Hydrated skin photographs noticeably better than dry skin. If you have redness or blemishes, a light tinted moisturizer or BB cream can make a real difference without looking like you're wearing anything.
Accessories
The rule for accessories in headshots is simple: you are the star. Not your watch. Not your necklace. Not your statement earrings. You.
Accessories should complement your look — not become the main character of it.
Jewelry for women: Keep it tasteful and intentional. A classic stud earring or a small hoop, a simple pendant necklace, a delicate bracelet — these add polish without competing for attention. Anything super flashy, sparkly, or reflective will catch studio light and draw the eye straight to it instead of your face. If you love statement jewelry, wear it in one place only — not all at once. Big earrings? Skip the necklace. Bold necklace? Simple earrings.
Necklaces: A simple necklace at collarbone length tends to frame the face beautifully. Layered chains can work if they're delicate. Avoid anything that rests at a distracting angle, sits in a visible neckline gap awkwardly, or makes noise when you move (you'd be surprised how often that last one matters during a session).
Rings: Fine. Just make sure they're clean — rings show up clearly in detail shots and in close crops.
Men's watches: A classic watch is a strong accessory for headshots — it adds sophistication without being distracting. Clean face, simple strap, not overly flashy. A chunky sport watch or anything with a very reflective surface might catch light unexpectedly. If you wear one, great. If not, don't feel like you need to add one.
Glasses: If you wear them, they're an accessory worth thinking about carefully. Bring a pair with minimal to no anti-reflective coating if possible — the purple tint that helps with screen glare is genuinely a nightmare under studio light. Even "clear" AR coating can create a slight color cast that's hard to correct. Sometimes your optometrist will let you borrow a display pair without coating. Make sure the lenses are clean before your session.
What to leave at home: Anything costume-y, anything with a strong logo, anything that makes noise, anything that you'd be constantly adjusting or worrying about during the session. Your accessories should be on and forgotten the second you sit down.
Studio vs Location
Both are great. The right one depends on what you're going for — and sometimes the answer is both.
In-Studio
Studio sessions give you full control. Controlled lighting means consistent, polished results regardless of weather or time of day. Backdrop options let us dial in exactly the right look for your brand — from clean white to warm neutral to dramatic dark gray. And because we're not dealing with wind, foot traffic, or changing light, we can focus entirely on you.
Studio is especially strong if you need multiple looks. Different outfits, different backgrounds, no commuting between locations. You show up and we make it happen.
A practical note for Eastern NC: a lot of photographers in the area are shooting in the same downtown spots and waterfront locations. If you want something that doesn't look like everyone else on the MLS, a studio session gives you that differentiation immediately.
On-Location
On-location sessions have a different energy. Natural light has a quality that studio lighting can approximate but never fully replicate — and real environments add context and texture that a backdrop can't. If you're a realtor who wants a shot that places you in your market, an entrepreneur whose workspace tells part of your story, or a creative who wants something with real texture and character — on-location might be your move.
The tradeoff is variability. Weather, time of day, and foot traffic all play a role. But when it comes together, it really comes together.
Some clients do both — a studio portion for clean versatile looks and an on-location portion for something with more character. You walk away with a full suite of images for every platform and every context. That's not a bad problem to have.
If you're not sure which direction makes sense for your brand, that's exactly what the consultation call is for.
Week Before and Day Of Checklist
The Week Before
Confirm your wardrobe selections (ideally finalized during your in-person consult)
Drink extra water daily — hydrated skin photographs noticeably better
Wear sunscreen — sun damage and peeling skin can't be fixed in editing
Schedule any haircut 3-5 days before your session, not day-of
Skip major skin treatments: waxing, threading, chemical peels, fillers — allow 5-7 days for any redness to resolve
Review your goals: what platforms is this for? What look are you going for? Gather any reference images you love.
Confirm your session time, location, and what to bring
Day Of
Arrive with your clothes pressed and lint-free
Put on your first outfit as close to departure time as possible to minimize wrinkles in transit
Bring all outfit options — don't pre-decide at home
Bring your glasses if you wear them, plus a pair without anti-glare coating if possible
Bring a brush or comb and some hairspray
Men: electric razor if shaving day-of
Bring a snack if you're someone who gets low-energy — nobody brings their best expression when they're hungry
Give yourself an extra 10 minutes. Rushed energy shows up in photos.
What retouching actually is (and means)
There's anxiety around this word on both ends of the spectrum — people worried they'll look fake, and people hoping for a transformation. Let's be clear about what actually happens.
Retouching is not a transformation. I'm not making you look like a different person. I'm not giving you someone else's jawline or subtracting a decade. That's not what you want — because if you show up to a meeting looking nothing like your headshot, that's an awkward way to start a relationship built on trust.
What retouching actually does:
Reduces (not eliminates) temporary blemishes, redness, and breakouts. Addresses flyaway hairs and distracting stray strands. Smooths mild texture and under-eye shadows. Removes temporary distractions — a piece of lint, a shine spot from a warm studio. Adjusts exposure, color balance, and contrast so the image is polished and print-ready.
What retouching does not do:
Change your bone structure, face shape, or proportions. Make you look significantly younger. Remove permanent features — scars, freckles, birthmarks — without an explicit conversation. Make you look like you were wearing more or less makeup than you actually were.
The goal of every image I deliver is simple: this looks exactly like you on your absolute best day. It should pass the recognition test — when someone who's only seen your headshot meets you in person, there should be immediate, unmistakable recognition. That's the standard.
If you have specific requests — a scar you'd like addressed, a birthmark softened — just say so. That's always a welcome conversation. But I'll never take creative liberty with your appearance without discussing it first.
How to use your headshots after you get them
This is the part almost nobody talks about. You did the session. You got the photos. Now what?
Update These First
These are the highest-visibility placements — prioritize them immediately:
LinkedIn profile photo
Google Business Profile
Website About page
Email signature
All social media profile photos (same photo or coordinated looks from the same session)
The Profile Photo Rotation Strategy
Here's something I share with every branding client, and it consistently gets the most surprised reaction: don't drop all your new photos at once.
Every time you update your profile photo on Facebook or Instagram, the platform treats it as activity and surfaces it to your connections. You get a wave of likes, comments, and sometimes direct reach-outs — for free, without posting anything new. People say things like "I've been meaning to reach back out!" That's real visibility that costs you nothing except the update.
Instead of swapping everything in one day and burning through that effect immediately — rotate. Change your profile photo every 4-6 weeks with a fresh look from your session. You stay top of mind for months, not a day. The people who do this consistently? They're always the ones who feel most "everywhere" in your feed.
How Often to Update
A good rule: if your headshot is more than four years old, it's working against you. If you've had a significant appearance change — new hair, style evolution, meaningful aging — update it sooner.
The test: someone who meets you in person after only seeing your headshot should recognize you immediately. If that's no longer true, it's time.
Think About Platform Sizing
Different platforms crop differently. LinkedIn uses a tight circle crop. Google Business shows more of the frame. Your website can feature the full image. When selecting your favorites from the gallery, keep cropping in mind — images with more space around your face tend to survive the circle crop better than tightly framed shots.
Use Your Images Consistently
Consistency builds recognition. When your LinkedIn, Instagram, website, and email signature all use coordinated images from the same session, your personal brand feels cohesive. People who encounter you across multiple platforms start to recognize you — and recognition translates directly to trust.
Ready to book?
Here's the truth: you don't need to lose 10 pounds first. You don't need a better reason or a less busy week. You don't need permission.
You just need to start.
Because the real power of a great headshot isn't the photo itself — it's the way it reminds you that you belong. On the website, in the room, at the table. And it's the way it tells everyone who encounters it: this person takes their work seriously.
My sessions start at $450. Need team headshots? Group sessions are available as low as $100 per person.
Get in touch for a custom quote or Book your session here →
No pressure, no pitch — just a conversation about what's going to work for you. Let's get you a photo that actually looks like you. The you that walks into a room and owns it.
Cheeeeeeeers 🥂 — Brad
Brad Poirier is a portrait and headshot photographer based in New Bern, NC, serving Eastern North Carolina including Jacksonville, Greenville, and Wilmington. Studio located at 2605 Trent Rd, New Bern, NC 28562.